This blog is part of a series! Be sure to check out Shipping 101 and Shipping 201.
Congratulations! You’ve successfully laid the groundwork for an ecommerce business. It’s time to look ahead and find more advanced ways to optimize your ShippingEasy account, streamline your shipping process, and expand your customer base in the final part of our Shipping 101 series.
If you’re new around here, start your 30-day free trial to ShippingEasy today!
Table of Contents
- Account optimization
- International shipping
- GlobalPost
- Omnichannel selling
- ConnectEasy
- Other ShippingEasy plans
- Conclusion
Account optimization
After you begin shipping orders, you’ll start to find shortcuts and want to save preferences. Welcome to shipping automation! Shipping automation automatically adds carrier and packaging preferences to orders. This decreases the amount of time spent adding information to shipments. Optimizing your ShippingEasy account with features like shipping presets, order tags, and shipping rules makes shipping more efficient as your business grows.
Shipping Presets
Shipping presets are shortcuts to your most-used carrier services. These shortcuts appear on the ready to ship page, making shipping presets easy to select when creating labels. Shipping presets can be used within shipping rules to apply carrier services to orders.
To create shipping presets, go to Settings > Shipment Settings > Shipping Presets > New Preset.
Once your shipping preset has been created, it’ll appear on your list of shipping presets. Merchants can choose up to 10 shipping presets by selecting the star icon next to each preset. You can see how shipping presets appear in your ShippingEasy account below.
Order Tags
Order tags are short pieces of text that help organize orders. For example, if you’d like to filter orders from new customers, you can create a new order tag named first-time. Along with shipping presets, order tags can be used in shipping rules.
To add an Order Tag to an individual order, go to the Orders page > Click your order > Scroll down to Tags > Enter and save your tag.
Shipping Rules
Shipping rules are made up of If/Then statements. Think of shipping rules in terms of cause and effect. The If statement will act as the cause, and the Then statement is the effect. For example, a shipping rule might state:
IF: Store is equal to Shopify
THEN: Set shipping preset to First Class Package
You can create shipping rules with the following steps: Settings > Shipment Settings > Shipping Rules > + Add New. Your shipping rule will then be applied to all incoming orders. If you’d like to apply a new shipping rule to pre-existing orders on the orders page, you can select the Rerun Shipping Rules button from the More dropdown menu on your Orders page.
Combining Orders
If a customer places separate orders, you can combine their orders into a single shipment to help save on shipping costs. The only big thing to note is orders can only be combined if they come from the same store. For example, a Shopify order can’t be combined with an Amazon order. Orders can be combined by going to the Orders page > Select the orders you want to combine > More > Combine Orders > Selected
Splitting Orders
The splitting orders function is used to separate orders with two or more items into multiple orders. Say your business has an item listed on your website for pre-order. The pre-order product won’t ship until the release date, but your customer buys this item along with available products. You can split the order and divide it into multiple shipments, so your customer doesn’t have to wait until the pre-sale item is available to receive their entire order. You can split orders on the orders page with the help of these steps: Orders page > Select the order you would like to split > More > Split Order.
Read our blog How Splitting Orders Can Save On Shipping for more info.
Filtering Orders
Orders can be filtered through categories such as the store the order came from, the order’s destination, and the order tags we discussed earlier. To filter your orders, go to your orders page and select more filters. From here, you’ll select the filters you need, and voila! You can remove the filters and return to your full unshipped order list by simply clicking the “x” next to the filter.
The shipment history page also has several filters to help you find orders that have shipped within the last 90 days. To filter orders on the Shipment History page, select Shipping > Shipment History > More Filters.
Notes
ShippingEasy currently supports three types of notes for your orders: customer, gift, and internal.
- Customer notes are notes directly from the customer and can be synced from stores like Amazon, Etsy, and Shopify.
- Gift notes are notes indicating when an order is a gift and let you know additional preparation is needed like a gift receipt or wrapping.
- Internal notes are notes written by your business as a reminder for an order. These might be used if the customer requested a specific service after checkout or if an order needs to be packaged differently.
To add notes for your orders, start on the Orders page > Click into the Order > Scroll down to Notes. To see your customer notes, start on the Orders page > More Filters > Notes > Check Customer.
International shipping
Expanding your customer base translates to expanding your reach. International shipping, or shipping outside of the US*, is an opportunity to showcase your products to a larger audience. If you don’t have experience with international shipping, we’re going to cover some of the basics to get you started.
*Note: Puerto Rico and military mail are technically considered domestic addresses but will need customs forms.
For more guidance on international shipping, check out The Beginner’s Guide to International Shipping Requirements !
VAT
A tax known as a Value Added Tax or VAT is added to products shipped to the United Kingdom and the European Union. The amount of VAT given to an item is based on its cost, and any materials used in the assembly of your product won’t be taxed again. To pay this tax for your customers, you’ll need access to your Import One-Stop-Shop, or IOSS, number.
IOSS
IOSS numbers are business-specific numbers given by your marketplace of choice. Your IOSS number can be added to ShippingEasy, so it’ll appear from a drop-down menu on your ready to ship page. To add your IOSS and other tax ID numbers, go to Settings > Shipment Settings > International Shipments.
GlobalPost
GlobalPost is one of our carrier partners that strives to make your domestic and international shipping easier. GlobalPost Standard International can be used for shipments up to 70 pounds and has an 8-12 day transit time as well as:
- Door-to-door tracking
- Up to $100 in coverage against loss or damage, plus shipping costs
- Shipping to over 220 countries
- Free HS Code classification service
GlobalPost also assigns electronic customs forms to shipments for you once your package reaches one of their facilities. This means you don’t need to print out or attach customs forms for international shipments.
You won’t need your passport to travel through the world of GlobalPost and GAP! Check out our blog, What are GlobalPost and the Global Advantage Program (GAP) ?
Omnichannel selling
Omnichannel selling can be used as an ecommerce buzzword. But what is it? Omnichannel selling is the act of creating a similar shopping experience for your customers across all of your marketplaces, whether online or in-person. Selling on multiple platforms is beneficial because multiple marketplaces give you access to more data. And, more data means you have a better understanding of what your customers are looking for.
Picture your favorite business. Why do you find yourself a repeat customer? Is it the personalized emails you receive from them? Is it their user-friendly website? If they have a physical store, do you get the same feeling shopping online you do in person?
Define your small business with the help of our Small Business Shipping Terms blog.
ConnectEasy
ConnectEasy is a downloadable application for printing labels, packing slips, and pick lists instantly from ShippingEasy. ConnectEasy can be added to your account through Settings > Devices and Hardware > ConnectEasy > Set Up ConnectEasy. Once you reach the setup screen, you’ll follow step-by-step directions for either Mac or PC.
Need a hint on how to print? Check out our blog about ConnectEasy!
Other ShippingEasy Plans
In addition to the free Starter plan, ShippingEasy has six other plans available for merchants: Growth, Basic, Plus, Select, Premium, and Enterprise. Upgrading to the Growth plan or higher will give you access to more features within ShippingEasy such as reports, USPS SCAN forms, and live support.
ShippingEasy support
The Growth plan and above has access to phone, chat, and email support Monday through Friday from 8am-6pm CST. This means you’ll have real-time troubleshooting with our award-winning support team during our business hours.
Reports
Along with support, merchants on the Growth plan and above have access to shipping reports, including a shipping margin report. Reports are broken down by order and include information such as the total shipping cost, order total, and sales tax. You can even schedule reports to be emailed to your business at a specific time, or you can export reports as needed. The reports page also has graphs to show the destinations/zones of your shipments and a brief summary of shipping costs, broken down by service.
SCAN Forms
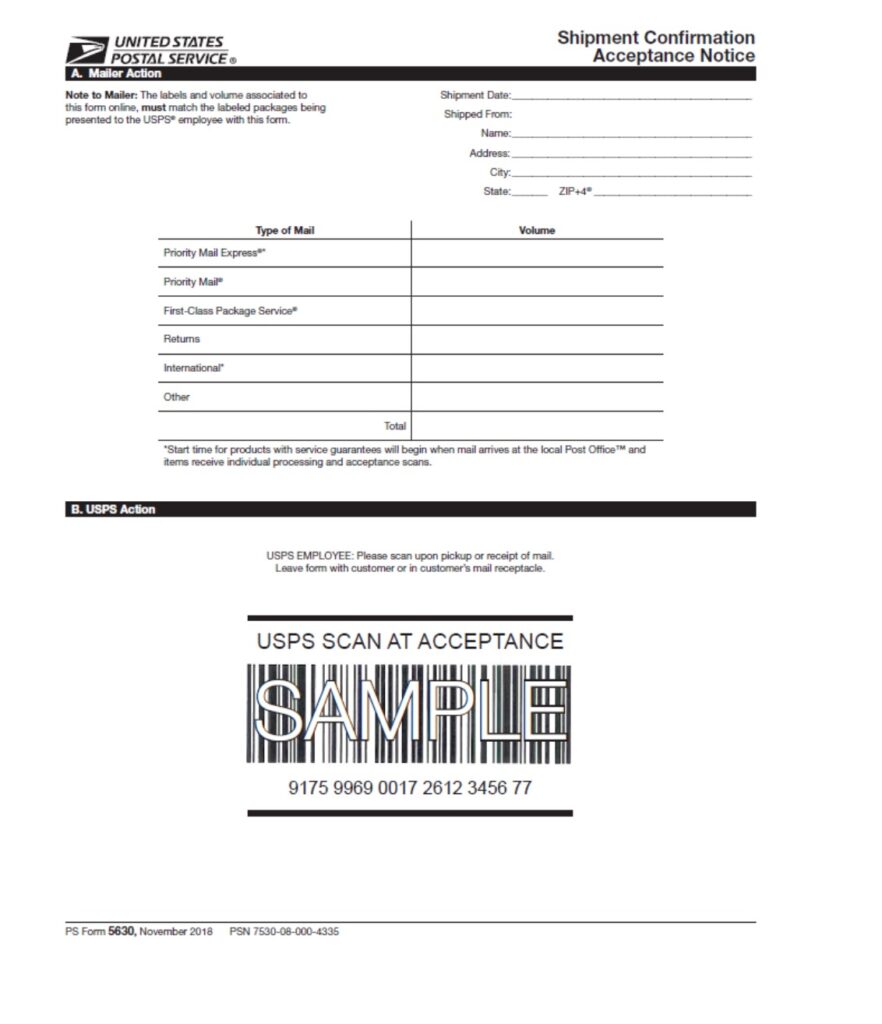
A USPS Shipment Confirmation Acceptance Notice, or SCAN form, creates one barcode for your postal worker to scan instead of having to scan each shipment individually. SCAN forms are created daily, and eligible shipments will automatically show up in your ShippingEasy account to make SCAN form creation as easy as possible.

Conclusion
Over the course of this series, your dream of opening your own business has become a reality. You’ve learned how to find shipping supplies and select your services, gained insight on how to establish your brand, and understand the benefits of expanding your business to a larger customer base. Class dismissed.
