The breakup of Mailchimp and Shopify takes full effect on May 12, 2019. You might be on the lookout for a Mailchimp alternative that feels just as intuitive and works seamlessly with Shopify. ShippingEasy’s Customer Marketing solution is that alternative, with the bonus of being part of an order management and shipping solution. This makes full use of your order, customer, and shipping data to fuel marketing campaigns that grow your business and improve your reputation. Let’s take a look at how easy it is to make the switch!
Your easy to-do list (click to skip to each section):
-
- Not a ShippingEasy customer yet? Sign up and add your Shopify store.
- Already a ShippingEasy customer? Add Customer Marketing.
- Download your customer list or segmented lists from Mailchimp.
- Take the template builder for a spin (and see how easy it is!).
- Never look back.
Add your Shopify store
ShippingEasy’s full integration with Shopify makes it a snap to add your store and import your orders. Below are the quick and simple steps to integrate your Shopify store into ShippingEasy:
-
- Start by beginning your 30-day free trial of ShippingEasy
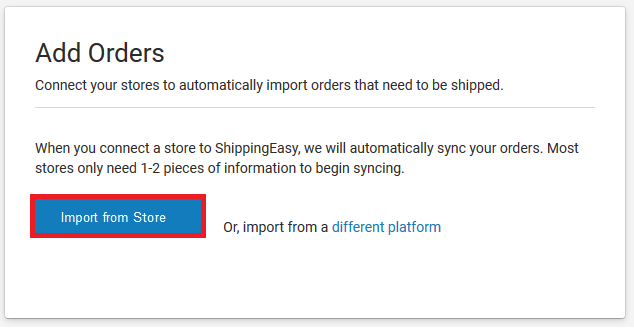
- You will be directed to start adding orders by integrating a store. To begin the store integration process, click on the button to Import from Store.
-
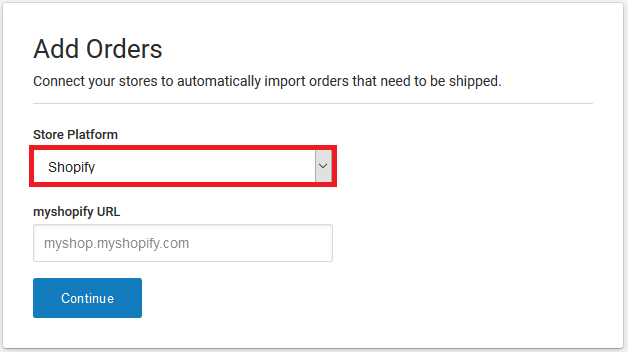
- Next, you’ll input your store’s credentials. Shopify will be populated in the Store Platform drop down.
-
- Grant ShippingEasy access to your store and you’re all set!
TIP: log into your Shopify account and copy/paste the URL from the address bar; remove all text after the .com
If you already have a ShippingEasy account, simply head to the Shopify App Store and click the Add app button, then click Install on the popup.
Check out our FAQ section for help with any other questions you have about using ShippingEasy with Shopify.
Add Customer Marketing
Once you have a ShippingEasy account set up or you’re logged into your current account, head to the Marketing tab in the dashboard. You’ll be able to kick the tires on the Customer Marketing solution to make sure it’s for you (we think it will be).
Check out the automation options like Abandoned Cart emails, Product Recommendations, and Win-back campaigns. Try out the email building tool and our library of pre-built templates at your disposal. Add tags to customers to create segmented lists of customers (more on importing your list from Mailchimp in a sec).
Once you get a feel for the platform, you can try to schedule a campaign to be prompted to add Customer Marketing, or you can go to the subscriptions page to toggle it on. You can upload unlimited customers to ShippingEasy. Each plan comes with a specified number of email credits, and you can always add more from the marketing dashboard.
Download your list from Mailchimp
You’ll need to download your customer contact list from Mailchimp and add it to ShippingEasy. One of the reasons ShippingEasy is a great Mailchimp alternative—you don’t have to recreate all of your segments! When you download your contacts from Mailchimp, it will keep the tags in quotes, separated by commas. These tags will stay with your customer contact information when you load the list to ShippingEasy and will be accessible in the left-hand column of your Customer Marketing dashboard. Here are the instructions to export your customer contact list.
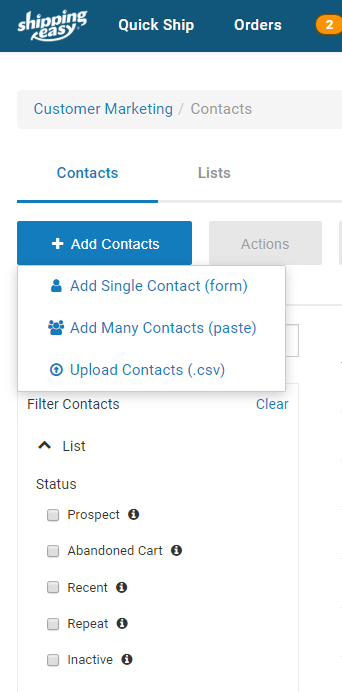
From there, it’s as simple as a couple clicks to add your customers. Hover over Marketing in the top of the ShippingEasy dashboard and click Contacts. You’ll see a blue button in the top left labeled +Add Contacts. Click that and then Upload Customers (.csv). Choose the file you saved onto your computer from Mailchimp and BOOM. Done.
If you want to learn more about adding customer tags, or want to tag all these customers with an “imported from Mailchimp” tag, check out the video tutorial below.
Start building templates
It’s easy to rebuild any templates you had set up in Mailchimp. You can even save sections to reuse in other email templates you build, so you don’t have to start from scratch each time. Any graphics and elements you used in Mailchimp can quickly be added to the image library in ShippingEasy’s Customer Marketing tool.
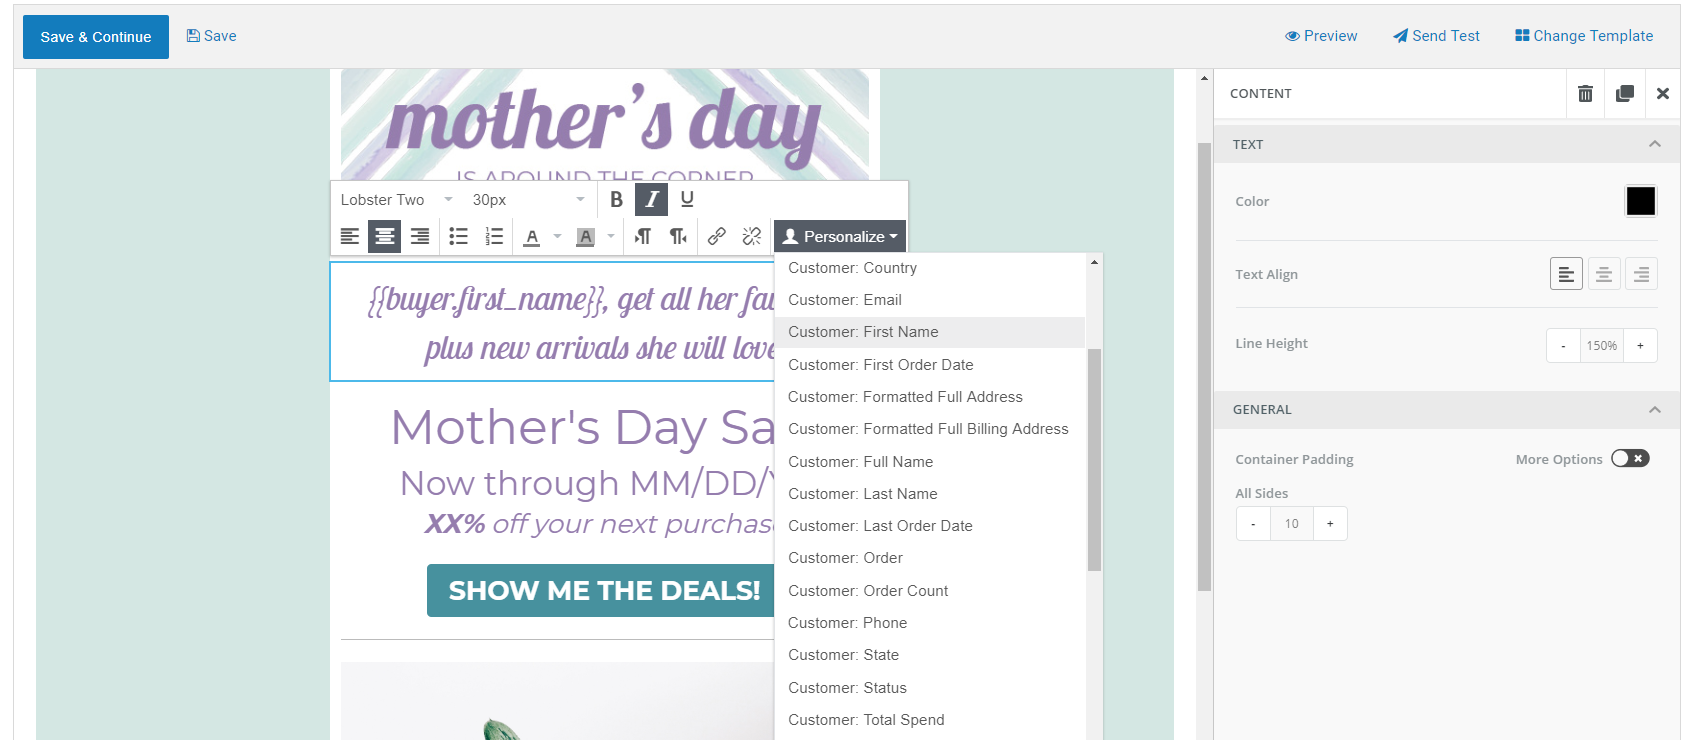
You have pretty much all the personalization options you had in Mailchimp, and many that are exclusive to the e-commerce environment our platform caters to. The personalization options are separated by Store, Order, and Customer parameters and give you the ability to make your emails feel like they were written for each specific customer.
One of the best things about using ShippingEasy is you’re not alone in all this. We employ an army of experts who are at your disposal any time you need us. Whether it’s a shipping configuration or you’d like help setting up a new email campaign, we’re available by phone, email, and chat to get you on the right track.
Don’t just rely on your previously-collected list. Grow your list with custom signup forms. Here’s how!
We also have a Product Education Specialist who is constantly churning out video tutorials for all you do-it-yourselfers. We’ve put together a playlist all about your Customer Marketing setup. You can dive into that by clicking the YouTube video above to view the entire playlist!
Ready to make the switch and have all your customer email marketing and order processing working together flawlessly, with no worry of a potential breakup?
BONUS: When you add our Inventory Management solution and give yourself access to the entire Shopify Seller Suite, your inventory data becomes part of the mix. You can access velocity and forecast data, sync inventory levels across selling channels, set up low-stock alerts, and have a complete e-commerce ecosystem under one roof!
Rob Zaleski
Latest posts by Rob Zaleski (see all)
- USPS 2023 Shipping Rate Changes - November 16, 2023
